Thursday, 30 October 2014

Film room project post mortem

What went well?

·         Modelling

I think all the modelling went very well and all the assets that were made came out very well.

·         Setting up the scene in engine

Getting all the assets into engine and have them in the right place was done very quick and saved a lot of time.

·         Splitting up the work load

I think that that work for modelling the assets was well done. So people who had assets that were hard or would take longer did not have to worry about having to do other jobs and people who only a few small and easy assets would not get bored waiting for other people.

What didn’t go well?

·         Timing

I feel that too much time was spent on some area that should not have taken so long as they and that is why I feel when trying to work in engine, some stuff was a bit rushed when more time could have been put into it.

What did I learn?

·         Colour Correction

Using the Colour correction in unreal, to make the scene match the original image.

·         Perspective Tool

How to use the perspective tool in 3DS max and how it can help make a quick white box.

·         Lighting in unreal 4

I learned how to use lights in unreal 4, how to make them work and how to change the settings to get different effects.  

·         Light maps

I learned how to make a light map in 3DS max and how to make it work in engine.

What would I do different next time?

·         Get into engine sooner

Could have started building the scene soon in engine and not wait for all the assets to be completed. I think if we had done this more problems would have been found soon and saving time.

·         Better time management

Try to plan out timing better next time and try to stick with it.

·         Be more organised

I think I need to be more organised and try to keep better file management, and to make sure files are named well.

Wednesday, 29 October 2014

Week 4, Year 2 Lights, camera, and now we have another problem

So the deadline for the film room was only a few days away and we need to get everything into engine. All the models had been made and textured we had a full scene in 3DS max, that look great.

So this is how it was now all we had to do was get it into engine. I volunteer for the job because that way I could learn how lights work in unreal 4. Getting it into engine was fine it was when I added the lights and then tried to build them. This is when I found out that a lot of the assets did not have light maps for them. So we had to find out which assets did not have them and make them. Then in engine make sure the light map resolution was put up so lights and shadows would work correctly. After that we found that the assets with metallic map were only showing as black but that was an easy fix just need to add a sphere reflection capture. The only way I knew you had to do that was when I used SDK (source developer kit) you had to add in to some areas mostly room to make sure reflections would work.  
Now that the lights and everything else was working now we had to take the final shot. The first problem was getting the camera in the right. Then playing around with the settings to try and make it match the forced perspective. The next problem was getting a reader from the camera and removing the sprites for the lights but after that we got the final shot and … wow


I cannot believe how well this turned out but that just makes me happier knowing that all the hard work that I and the other guys put in, has paid off with a great result. This was a very hard week making sure that everything work and trying not to pull my hair out at unreal 4.

Week 3, Year 2 Walls, ceiling and forced perspective

So this week still working on the film room Project. I was given the task of creating the walls and ceiling and the other objects was split up between the other group members. I was give the walls and the ceiling because my white box came the best out of the other group.

So my plan was to create one side of the wall then copy it over to the other side but very quickly I found a problem with this idea and so did my other team members. In the film they used forced perspective in the scene. This made the room off set and when I copied the wall over it was not in line at all. So I only had to move some of the vertex.

Texturing the walls was very ease only because it was just white but making the texture on the back walls was a very hard and challenging. I started by making one pattern and copying into a line. Then copying the line moving it over and up a bit and then doing the same all the way across, made sure it would tile and then added it to the wall texture.
     
 So this week I had a go at making landscapes in unreal and found out there are a 2 ways going about it. You can start with a flat landscape and then use the tools to make the hill or make an image but it has to be in grayscale with a 16 bit channel and saved as a png. I used the image way it was fast at getting better results and what you can do is edited in unreal with the same tools as if you were going to start from scratch. What I would like to do is try and add a river to it at one point.


After I made my landscape I had a go with the foliage tool to add bushes and rocks around the area. This gave me the idea that if my own trees, bushes, and grass I could make a simply and quick wood. 


Week 2, Year 2 Out of one and right back into another

So at the start of this week was the hand in date for the asset swap project and on the very same day we found out the next project. The film room project, this is another group one but this time it was only a team of 4. The idea is that we pick a room from a film but we had to look at lighting and mood.

In the first week I and my group just came up with ideas and we all each made our own moodboards. I pick out a room that I found that had an interesting colours used in it. I then pick out some of these rooms and look at their colour palette
This is total recall (1990) I pick this room because of the strong use of red lights in a blue, grey room.

The way I found to fine out the colour palette of an image, is to break down the colour. There is a great way to do this in Photoshop, if you go to Filter > Pixelate > crystallize. I then used the eyedropper tool to pick out colours that were the most present.

After me and my group were all done making moodboards and colour palettes. We showed each other what we have got and made a group diction on witch would be the best room. Our first idea was to go with Balin tomb out of Lord of the rings.


But after having a talk with other people we found that this room would be too hard create because of the amount of assets that would need to be make. It would have taken far too long. So we went back a step and had a relook at what we had and see if we could find a room with more of a simply layout and had less in it but still had few assets in it to still make it interesting.

So after some rethinking we pick this room out of Xmen first class. I think this room was a much better idea to go with because of the shape of the room. It is just not flat walls and the other objects in the room have a very nice looking shape that make them stand out.


In game production we had a look at how to use perspective match tool in 3DS max. With this tool you could put in an image in to 3DS Max and then match the XYZ to the image so that when you start to model it will match the perspective in the image.  


By doing this I was able to create a very quick white box for the room. We all used this white box as a template for when we came to create the assets.


So this week in unreal I had a look on how to make a Static mesh into a physical mesh so that when you load the level the mesh can move around and the player can interact with it. It was very simply to do all you have to do is place an object it to the level and then in bottom right box to go the physics tab and then tick the simulate physics. So now knowing this I came up with the idea to make 10 pin bowling in unreal, sadly you cannot control the bowling ball


Week 1, Year 2 A new year and new things

So I made it past my first year of universal at De Montfort doing Game art design and so I’m starting my 2nd year. Already we have been set a project but this is a group project and there are new software and technique we have to learn.

This project is called asset swap. I and 5 other people have to create 6 different assets and put them in a scene, all in 1 week but we are not just picking 1 and just working on that. We had to work on 1 stage for all 6 assets and that way all the assets would be completed. This is so we can get a feel of what it’s like working in a team because no one in the game industry works on their own. I found this project very fun and a nice start to the start of the year.

This is the finale Silhouette and concept for the tankard I made. I did this digitally because I want to try and improve my digital painting. I then also had to make this in 3D after that I had to make the texture for the hog. I found the hog very hard to texture because I could not think of a way to get photo that I could use as a texture. So I had a go at trying to back by only using the tools in Photoshop. I found my end result was ok but it did not fit that well in the end scene. I do wish now I had taken more time to think of what I could have done to get the result that was really needed.
Then end scene look great the only thing that did make not look right was the texture for the hog that I made. It did get retextured but did still show a lot of the old texture. If I was to do this again I would look a lot more in to texturing, like maybe trying to digital paint it. I also could have spent a little less time on the concept part of the project.

So this year we are now using unreal 4 and wow it is funny. I have been playing around with it just learning very simply things like how to move and how to import models and textures but there are so many other tools I want to and I think what I may try and do is once a week try and learn a new tool in unreal 4.

So this year there are some software I really want to look into and learn, like Zbrush. I would really like to learn Zbrush because I think it would really help me with my work in the future. So for anything very complex like a high detail statues or character. Zbrush could help me make the high poly model and then bake it down into a normal map.

So in my own time there may be other subjects I would like to write about. So of the idea I have got are Good and bad level design, the history of competitive gaming, what make a level look good, and then maybe some reviews of game that have come out.

Well this first week was very good and I am very happy being back. It was a little hard at first being put into a group project and having to learn a new technique on the very first day but I think it was a good way to get be into the year after all these next few year are not going to be easy at all. So I need to keep pushing myself to be the best that I can be and then not to stop and keep going.


Thank you for reading

Friday, 25 April 2014

Task 6 – Art Direction

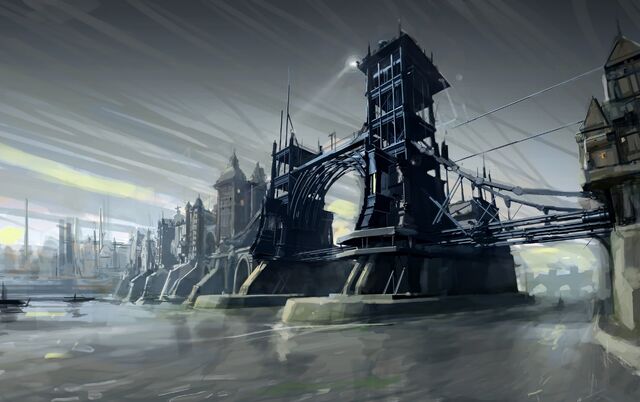
For this task I have to pick out a painting, photo, film or game, I then need to analysis and to say what I like about it. There are a few that I would like to look at but I only need to pick one. I had a look throw some of my favourite artist to find pieces of work that I like. In the end I choose a digital painting called “Dunwall Bridge” by Viktor Antonov. It was created as any concept pieces for a game called dishonoured.  


Why did I pick it?
I pick this because Dishonoured is one of the few games to make me stop and look around, not to find hidden things but just so I could see how great it looks. That is why I love looking at the concept work for the game and seeing how close it matches to the game. It is also made by Viktor Antonov, who is an artist that I have been a big fan of because of his work on half-life 2, which is my favourite game of all time. I think the best way to look into the image is to break it down into the elements of design. These are Line, shape, colour, texture, tone, form, space, and depth.

Line, where do I start looking and where do I go from there?
When I first look at this image the first thing that stands out to me is the light, at the top the bridge close to the middle. From there I look down the tower looking at the lines that go down it. About half way down I follow the roof to the right, of what I think is some sort of control room. This then leads me to a long metal wire that curves down to the very right of the image. From here I then go to a building that bring to some metal looking pips that go back left, under the first tower. I keep following this line left till I get to the second tower. When I get to the second tower I follow the lines up the tower to the very top of it and then go along the top to the left that leads me onto the buildings to the left and I keep going left following the roofs till I get to the end.

This gives you a good look of the whole image and keeps you very close to the 2 tower of the bridge. What is the point of this image to show. The line takes you on a very good look but it shows a very good point on where to start.

Shape, what different shapes stand out to me?
The main part of this image is the bridge so I think it would be best to talk about the shape of that. Just by looking at the bridge, you can see there are many geometric shapes, they make the outside of the bridge and there are many more within the bridge itself. The 2 towers are like simply block shapes with an ellipse in the centre and a right angle triangle to the right side to show the metal wires. Within these shapes there are more geometric shapes like on the towers there are parallelograms that show the metal building supports.

Colour, what dose he use and why?
Right away I see a lot of dark blues and grey blues. This gives it a very well-worn and grimy feel to the image. The colours used on the bridge also give it a very industrial feel to, what gives an idea of what going on in this world.

Texture, how are surface Martials shown?
I see that a lot of the textures have a matt and smooth look to them this can be seen in the water at the bottom of the image is shown very nicely by the way by the smooth lines of different colourer that blend in well with each other but also the darker colours to show the reflection of the bridge and buildings. The metal of the bridge can be seen; by the 1 colour he use then adds 1-2 more colours to show shadows or reflection of other parts of the bridge.

Tone, how is shading used to show form?
There is a lot of shading used on this image, mostly on the bridge to make it stand out and have depth to it. On the first tower (the on close to the right) you can see how different tones have been used to show the support that keep the tower up but you can all so see the different floors that go up the tower. There is also a nice use of tone used on a part below the building on the left. You can really see how they come out of the wall into the water by the dark tone used to show one side of the walls. By his use of tone he makes the bridge stand out very well by using a gradient that is dark at the top and bottom of the image and then making it lighter in the centre because the dark colours used on the bridge make it really stand out nicely, he also use more lighter colours on the buildings to the left of the bridge so that they don’t take your eyes away from the bridge.

Form, how does the image look 3D?
The form of the bridge is mostly because of the tone and colours used but it allows you see to see what the width of the bridge is and that you can then use that with other objects in the world to get an idea of how big it is.

Space, what space is used in the image?
The most space is used up by the bridge because it is what the image is about but if you look at the image in the rule of 3rd you can see a lot more going on. The left line horizontal goes right up the left tower of the bridge and both vertical lines meet the tower as well, one half way up the tower and then goes along the bridge to the second tower and the other line at the bottom of the tower. This is a really good use of the rule of 3rd and helps make the bridge stand out more the eye.

Depth, what is in the foreground, background, and middle ground?
There is nothing in the foreground but there are 2 things in the background that show depth in the image. On the very middle left you can see what looks like to be buildings and towers but not with any detail on them but you can still make out what they are meant to be. If you also look to the very right and follow the water you can see in the background there is another bridge, again there is no detail on it but you can tell what it is meant to be. This help fill in what would be empty space but it does not take your eyes off what you are meant to be looking at.

This is how I see this image but if you can’t maybe this will help

Line – red
Shape – yellow
Texture – dark blue
Tone – Green
Form – light blue
Space – purple (rule of 3rd)
Depth – orange

I think I have learnt a lot by looking at this image and I think I could maybe use it on my future work if I need to.


Websites used

Task 5 – Game Art Careers

For this task I need to find a company with a job role I would like to do. I have look at a few different company but in the end went with Valve.
Company - Valve software

Job – Artist

Job description - We’re looking for versatile, self-directed artists who have experience in 2D character and world design and enjoy working in a fast-paced, collaborative environment. Your folio should, above all, demonstrate originality, an ability to iterate, and an understanding of color and form. It should also reflect a solid understanding of anatomy and painting, and contain examples that show your awareness and appreciation of Valve’s various Intellectual Properties.

Duties:
Integrate into a multi-disciplinary team (6-8 people) and continually produce useful concept design based on the group’s collective conversations and decisions.
Iterate quickly and submit work that solves problems rather than creates them.
Self-manage and also be aware of the needs and requirements of those around you.
Generate ideas and use 2D/3D work to communicate those ideas to the team.

Requirements:
Working knowledge of 3D packages such as ZBrush, Mudbox, SketchUp, etc.
Communication skills that allow you to describe your process maturely and succinctly
Ability to change gears quickly when needed

Why did I pick this job?
I have been a long time valve fan because of the video games that they create like half-life 2, portal, Dota2 and many more and it would be great to help work on their next game. Also valve have a very interesting way of working that appeals to me and that is they have no managers and employs are allowed to work on what they want, when they want but this means they are looking for very hard working people and love what they do.

How I compare myself to the job description
Valve is asking for a lager verity of different personal skills and abilities. The first thing they are asking for is someone who is “self-directed and who has experience in 2D character and world design”. I do have the experience in 2D character and world design from the work I have been doing on my course, that I’m on right now but I do not fell like it is self-directed because its work I have been told to do and I have not really done anything by myself in my own time to practice these skills that I have been learning.
They also say that you need to enjoy working in a fast-paced, collaborative environment. This is something that I fell I fall down on a bit because of low experience, I don’t feel like I can do my work fast and that I have to take my time just so that I fell like I’m doing right. It’s the same thing with the collaborative environment I really have no experience with this because I do like to keep to myself what I know is not very good if I’m going to be working in a team with other people and that we need to communicate with each other.

Looking at what they want in your folio I think the number 1 thing they want is to “demonstrate originality, an ability to iterate, and an understanding of color and form”. I think from the work I have done I can originality but they will be looking for a lot more. For the iterate skill I could repeatedly do the work but again not at a very fast pace that they would be looking for. As for understanding color and form. I think that I could maybe do a bit more for understanding colour but from the work I have already done, I can show a good understanding of form.

They want people to show that they have a very solid understanding of anatomy and painting. I can show that I have a good understanding of anatomy from the life drawing but it can always be improved. As for painting I have a lot that I need to work on because I have only ever used watercolours and nothing like oil paints or acrylic that they would be looking for as well.

What I think of the duties I will have to do
Form looking at what I may have to do I think one of the think I may have a bit of a problem is that you will have to be working in a team of 6-8 people and that you may have to integrate. I think I would have the most problems with because my people and communicate skills are not as strong as I would like them to be and as I said before I don’t really have much experience in working in teams.
Next they need people who can “Iterate quickly and submit work that solves problems rather than creates them”. I do like to think that I am a good problem solver but doing it quickly is something that I don’t know if I could do.

They are saying they want people who are “Self-manage and also be aware of the needs and requirements of those around you”. I do think I can self-manage but could be a lot better if I was more organised with my work and I do like to help other people but the only way to be aware of other people’s needs are is by communicate. So I feel this may be a bit hard for me to do.
They also need people that can “Generate ideas and use 2D/3D work to communicate those ideas to the team”. I think I could generate ideas very well but have not way to really show that right now and then to communicate those ideas to other people could be hard for me.

What requirements I have that meat what valve want
I have work with 3D software a lot but not of any they have listed but don’t think that will be much of a problem as long as I show I have a good understanding of 3D.
As I have said many times before now my communicate skill are not very strong and could use a lot of work on them. They want people who have the “Ability to change gears quickly when needed” I think I could do this but still would not like the idea of maybe leaving uncompleted work.

What I think overall and what I can do to improve myself, to make myself better fitted to the job?
Overall I think I need to do a lot of work if I want to work a valve as an artist. What I think I should be looking at to improve is my self-directed work, to be more organised, and people skills. With the self-directed, and organised I think I could kill 2 birds with one stone by planning out my own work, that would help on improving my artist skills that I don’t have. For the people skills I could start spending less time on my computer and just find more things to do in my free time but organise it so I still do my work.

I may make another post in a year or so, just to see how I’m doing.

http://www.valvesoftware.com/jobs/job_postings.html